IDE And Environment Setting
GPU INFO
full name
nvidia-smi -L
Shortcut Key
Powerpoint
Navigating
Ctrl+F1: Hides/unhides the Ribbon (very useful for quickly freeing up space on small screens)
While Presenting
+: Zooms into the slide (up to three zoom levels); once zoomed in, you can pan the slide with the mouse cursor or the arrow keys
-: Zooms out of the slide to provide an overview of all slides of the presentation (including sections)
B: Blacks the screen
PowerPoint Shortcuts to Manage Display
Alt+F9: Show or hide gridlines and guides
Edit
Alt + R: Spell Check
Alt + key : Changing Tabs
Shift + Up Arrow/Down arrow : Select or Deselect Text
Jupyter Notebook
Command Mode
Arrow Up/Arrow Down : Navigate between cells A: Insert a new cell above the current cell. B: Insert a new cell below the current cell. C: Copy the selected cell. V: Paste the copied cell below the current cell. D: Delete the selected cell. Z: Undo the last cell operation. M: Convert the selected cell to a markdown cell. Y: Convert the selected cell to a code cell. Shift + Arrow Up/Arrow Down: Select multiple cells. Ctrl + Shift + - : Split the current cell at the cursor. Ctrl + Shift + Minus : Split the current cell at the cursor. Shift + M: Merge selected cells. Ctrl + Shift + P: Open the command palette. Shift + Enter : Run the current cell and move the cursor to the next cell. Ctrl + Enter : Run the current cell without moving the cursor.
Edit Mode
Tab: Code completion or indent. Ctrl + Shift + –: Split the current cell at the cursor. Ctrl + ]: Indent. Ctrl + [: Dedent. Ctrl + A: Select all. Ctrl + Z: Undo. Ctrl + Y: Redo. Ctrl + Home: Go to cell start. Ctrl + End: Go to cell end.
Visual Studio
Navigate Backward / Forward: Ctrl + - / Ctrl + ^ + -
Toggle bookmark: Ctrl + k, Ctrl + k
navigate to the next bookmark: Ctrl + k, Ctrl + n
navigate to the previous bookmark: Ctrl + k, Ctrl + p
Uncomment selection: Ctrl + K, Ctrl + U
Blender
Zoom: scroll MMB
Rotate: Hold and drag MMB
Pan: Shift + MMB
sidebar: n
Unreal Engine 5
viewpoint navigation
Tilt camera : right click + moving
Move Around : right click + W, A, S, D
Move Up/Down : right click + Q, E
Accelerate/Decelerate Movement: Middle mouse bottun
Actor Operation
Focus on Actor: F
Move Actor: W
Rotate Actor: E
Scale Actor: R
Switch Tools: Space
Duplicate Actor: Alt key + moving
Snap to Surface: End
Level Operation
Create New Level: Ctrl + N
Save Level: Ctrl + S
Save Everything: Ctrl + Shift + s
Adjust Lighting: Ctrl + L
Play Mode
Enter Play Mode: alt + p
Exit Play Mode: ESC
Enter Simulation Mode: Alt + s
Toggle Content Drawer: ctrl + space
Browse to selected item: ctrl + b
Edit selected item: ctrl + e
Create new folder: ctrl + shift + n
Duplicate selected item: ctrl + d
Create Camera Bookmark: ctrl + 1, 2, 3 …
Editor fullscreen mode: shift + f11
Toggle Game Mode: G
sublime text 3
Show/Hide sidebar: Ctrl + K and Ctrl + B
Duplicate lines: Ctrl + Shift + D
Goto line number: Ctrl + G
select word: Ctrl + D
select all of the word: Alt + F3
jump back: Alt + -
jump forward: Alt + Shift + -
upper case: Ctrl + KU
lower case: Ctrl + KL
Vim
Delete character: x
go to 2nd line: :2
add: a or A
move down: j
move up: k
move left: h
move right: l
go bottom: G
go top: gg
add a line(below): o
add a line(above): O
go to next word: w
go back last word: b
delete word: dw
delete rest of line: D
delete rest of line and insert: C
delete to char a: dta
cut a word and paste: diw + p or P
Qt Creator
Stop Debugging: Shift + F5
Next Bookmark: Ctrl + .
Previous Bookmark: Ctrl + ,
Show/Hide side menu: Alt + 0
Terminator
Ctrl+Shift+E: Split the view vertically.
Ctrl+Shift+O: Split the view horizontally.
Ctrl+Shift+P: Focus be active on the previous view.
Ctrl+Shift+N: Focus be active on the next view.
Ctrl+Shift+W: Close the view where the focus is on.
Ctrl+Shift+Q: Exit terminator.
Ctrl+Tab: Next Window
Ctrl+pgup: previous tab
ctrl+pgdown: next tab
Ubuntu Shortcut Key
Ctrl + Alt + F1~F6: change tty terminal
alt + f10: maximize window
Synology NAS Setting
Connect NAS to Windows Computer
Step 1: Install SYNOLOGY assistant in Windows
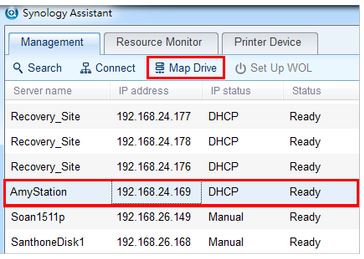
Step 2: Connect to your Synology NAS on your Windows computer using Synology Assistant.
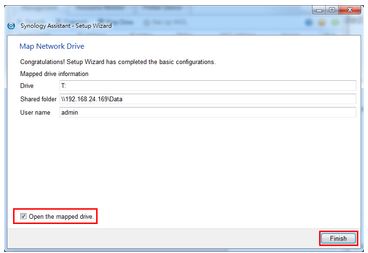
Step 3: Synology Assistant Setup Wizard
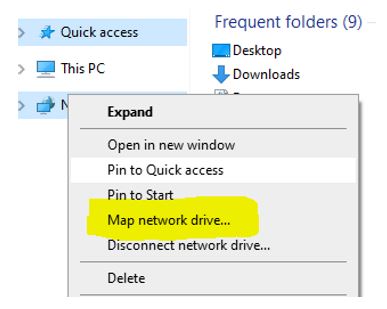
Step 4: Synology NAS Folders directly from Windows Explorer
Environment Setting
Set Python3 Build
step 1: In sublime text 3, select Tools -> Build System -> New Build System
step 2: find your python3 path, maybe you can use which command to find.
$ which python3
in my case, my path is /usr/bin/python3
step 3: then, add following code:
{
 "cmd": ["/usr/bin/python3", "-u", "$file"],
 "file_regex": "^[ ]File \"(...?)\", line ([0-9]*)",
 "selector": "source.python"
}
step 4: save as: py3.sublime-build
step 5: select, Tools -> Build System -> py3
and run your code using Ctrl+B
Go
Variable Declaration
	var i int =10
	fmt.Printf("%v, %T\n", i, i)
or
i:=10
Can't redeclare variables, but can shadow them variables must be used
Const
const a = 10
or
const (
    a = 1
    b = 2
    c = 3
)
Array
grades := [3]int{100, 60, 70}
fmt.Printf("grade: %v", grades)
or
var names [3]string
names[0] = "Tim"
names[1] = "Tom"
names[2] = "Bob"
2D Array
var mask [3][3]int
mask[0] = [3]int{1,0,1}
mask[1] = [3]int{0,1,0}
mask[2] = [3]int{0,0,1}
Check GPU
$ sudo lshw -C display
Install cuDNN: 7.6.5 in Ubuntu 18.04 (x64)
Debian Installation:
-
Download
cuDNN Runtime Library for Ubuntu18.04 (Deb),cuDNN Developer Library for Ubuntu18.04 (Deb),cuDNN Code Samples and User Guide for Ubuntu18.04 (Deb) -
Install
Install runtime:
$ sudo dpkg -i libcudnn7_7.6.5.32-1+cuda10.2_amd64.deb
Install developer library:
$ sudo dpkg -i libcudnn7-dev_7.6.5.32-1+cuda10.2_amd64.deb
Install code samples
$ sudo dpkg -i libcudnn7-doc_7.6.5.32-1+cuda10.2_amd64.deb
Install TensorRT
Install TensorRT 7.0 in Ubuntu 18.04 (x64)
-
Install
$ sudo dpkg -i nv-tensorrt-repo-ubuntu1804-cuda10.2-trt7.0.0.11-ga-20191216_1-1_amd64.deb
$ sudo apt-key add /var/nv-tensorrt-repo-${tag}/7fa2af80.pub
$ sudo apt-get update
$ sudo apt-get install tensorrt libcudnn7
using Python 3:
$ sudo apt-get install python3-libnvinfer-dev
Use TensorRT with TensorFlow:
$ sudo apt-get install uff-converter-tf
Verify the installation:
$ dpkg -l | grep TensorRT
Uninstall TensorRT
Step 1: Uninstall libnvinfer7 which was installed using the Debian:
$ sudo apt-get purge "libnvinfer*"
Step 2: Uninstall uff-converter-tf, graphsurgeon-tf, and onnx-graphsurgeon which were also installed using the Debian
$ sudo apt-get purge graphsurgeon-tf onnx-graphsurgeon
Step 3: Uninstall the Python TensorRT wheel file If using Python 3.x:
$ sudo pip3 uninstall tensorrt
Step 4: Uninstall the Python UFF wheel file If using Python 3.x:
$ sudo pip3 uninstall uff
Step 5: Uninstall the Python GraphSurgeon wheel file If using Python 3.x:
$ sudo pip3 uninstall graphsurgeon
Step 6: Uninstall the Python ONNX GraphSurgeon wheel file If using Python 3.x:
$ sudo pip3 uninstall onnx-graphsurgeon
Install DeepStream 5.0
Nvidia said… You must install the following components: - Ubuntu 18.04 - GStreamer 1.14.1 - NVIDIA driver 450.51 - CUDA 10.2 - TensorRT 7.0.X
Install dependencies:
$ sudo apt install \
libssl1.0.0 \
libgstreamer1.0-0 \
gstreamer1.0-tools \
gstreamer1.0-plugins-good \
gstreamer1.0-plugins-bad \
gstreamer1.0-plugins-ugly \
gstreamer1.0-libav \
libgstrtspserver-1.0-0 \
libjansson4
Download DeepStream 5.0 dGPU Debian package
Install .deb file
$ sudo apt-get install ./deepstream-5.0_5.0.1-1_amd64.deb
Uninstall DeepStream
Remove DeepStream 4.0 or later installations:
$ cd /opt/nvidia/deepstream/deepstream/
$ PREV_DS_VER as 4.0
$ sudo ./uninstall.sh
VS Code
Python Interactive Mode
create an empty .py file and type:
# %%
VS Code Remote SSH Setting
Local PC Setting
Create your local SSH key pair:
$ ssh-keygen -t rsa -b 4096
Connecting to a Linux SSH host:
$ export USER_AT_HOST=user-name@hostname
$ export PUBKEYPATH=$HOME/.ssh/id_rsa.pub

$ ssh-copy-id -i "$PUBKEYPATH" "$USER_AT_HOST"
SSH file and folder permissions:
$ chmod 700 ~/.ssh
$ chmod 600 ~/.ssh/config
$ chmod 600 ~/.ssh/id_rsa.pub
Connect To A Remote Host In VS Code
Step 1: In VS Code, Command Palette (F1)
Step 2: Search Remote-SSH: Connect to Host and Click
Step 3: Type user@hostname
CMake Configuration
Step 1: Install c++ extension, ctrl+shift+x search "c++".
Step 2: Install cmake tools extension, ctrl+shift+x search "Cmake tools"
Step 3: make GCC installed.
Create CMake project
step 1: create CMakeLists.txt and .cpp files
step 2: build, ctrl+shift+p and type cmake:Configure, select cpp compiler
step 3: ctrl+shift+p and type cmake:Build
If need selelct debug/release mode by ctrl+shift+p and type CMake: Select Variant
Debug
ctrl+shift+p, type CMake: Debug
Sublime Text
Install Plugin
Step 1: Open Sublime Text, ctrl+shift+p and type "install package control"
Step 2: ctrl+shift+p and type "install package"
Step 3: type your package name and check your plugin.
Anaconda
Installation
Download bash file, then install.
e.g.
$ bash Anaconda3-2021.05-Linux-x86_64.sh
Uninstall
Delete anaconda directory
$ rm -rf ~/anaconda3
Remove conda path from ~./bash_profile:
e.g.
$ export PATH="/Users/jsmith/anaconda3/bin:$PATH"