Nvidia Developement
TensorRT
Build Phase
- Create a
Logger - Create a
BuilderandBuilderConfig - Build
Network - Generate
SerializedNetwork
Runtime Phase
- Build
Engine - Create
Context - Set
Buffer - Copy
Bufferfrom Host to Device - Run
Excute - Copy
Bufferfrom Device to Host - Delete mempry
Onnx to TensorRT engine
Generate Static Batchsize:
./trtexec --onnx=<onnx_file> \
          --explicitBatch \
          --saveEngine=<tensorRT_engine_file> \
          --workspace=<size_in_megabytes> \. # 设置工作空间的大小
          --fp16
Generate Dynamic Bactchsize:
./trtexec --onnx=<onnx_file> \
          --minShapes=input:<shape_of_min_batch> \
          --optShapes=input:<shape_of_opt_batch> \
          --maxShapes=input:<shape_of_max_batch> \
          --saveEngine=<tensorRT_engine_file> \
          --workspace=<size_in_megabytes> \. # 设置工作空间的大小
          --fp16
e.g.
./trtexec --onnx=yolov4_-1_3_416_416_dynamic.onnx \
          --minShapes=input:1x3x416x416 \
          --optShapes=input:8x3x416x416 \
          --maxShapes=input:8x3x416x416 \
          --saveEngine=yolov4_-1_3_416_416_dynamic_b8_fp16.engine \
          --workspace=4096 \. # 设置工作空间的大小
          --fp16
Note: your input name should match onnx file input name
export profile json
trtexec --onnx=yolov4_4_3_608_608_static.onnx --explicitBatch --saveEngine=test.plan --workspace=3072 --fp16 --exportProfile=prof.json --exportLayerInfo=graph.json --profilingVerbosity=detailed
Nvidia TensorRT Docker
docker run --gpus all -it --rm -v $(pwd):/workdir nvcr.io/nvidia/tensorrt:21.10-py3
Nsight Family
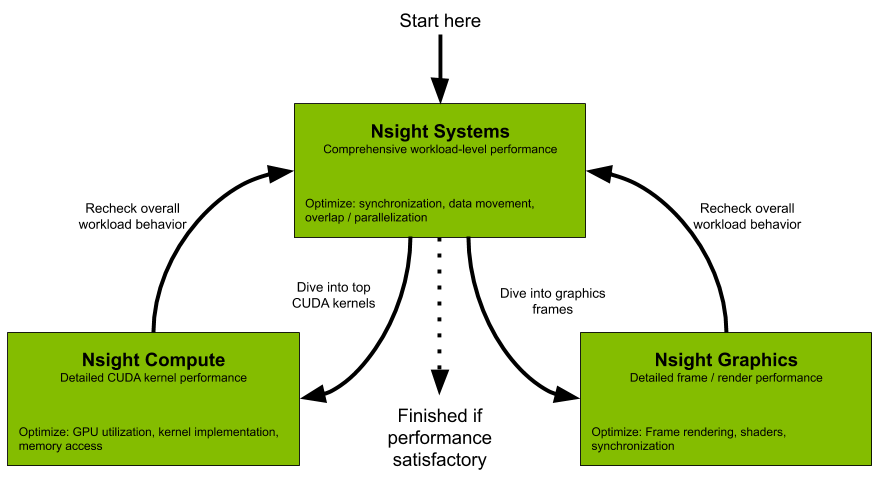
Nsight Systems: system-wide application algorithm tuning
Nsight Compute: Debug/optimize specific CUDA kernel
Nsight Graphics: Debug/optimize specific graphics
IDE Plugins:
- Nsight Eclipse Edition/Visual Studio
Nsight Systems
NVIDIA Nsight Systems provides developers with a more complete and unified view of how their applications utilize a computer's CPUs and GPUs.
Nsight Systems allows you to identify issues such as GPU starvation, unnecessary GPU synchronization, insufficient CPU parallelization or pipelining, and unexpectedly expensive CPU or GPU algorithms.
Sample profile: 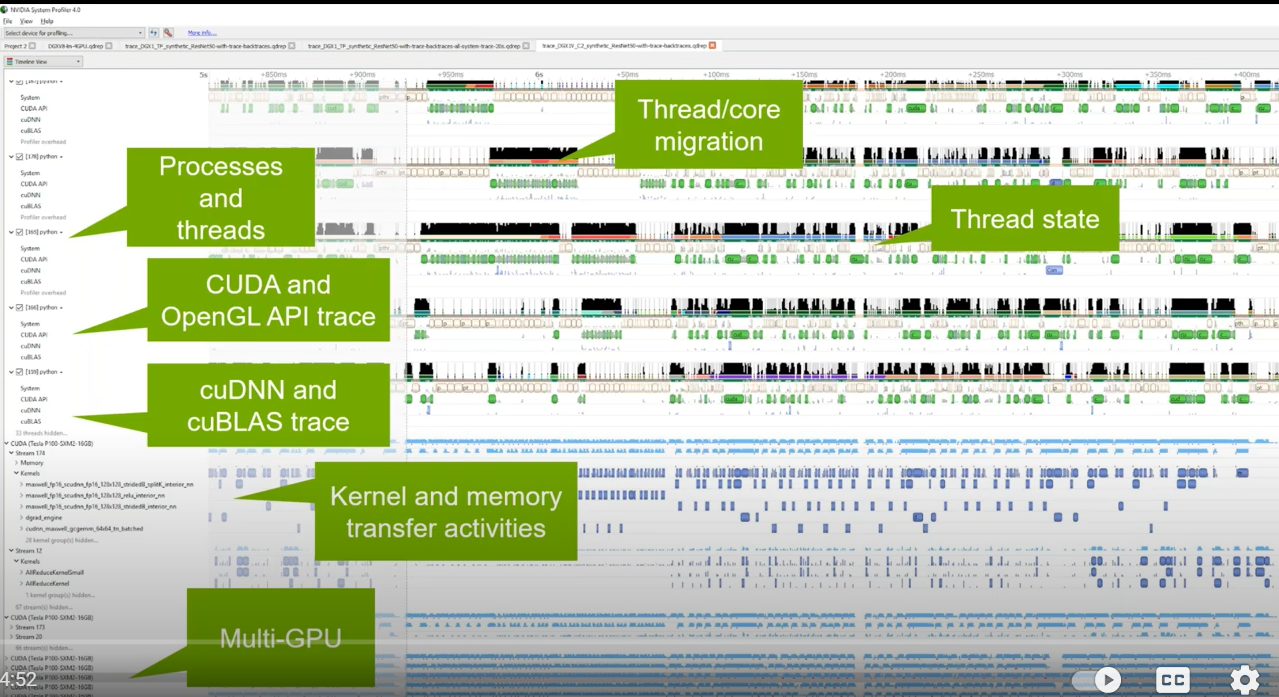
Command
Version Information
$ nsys -v
Default analysis run
$ nsys profile <application> [application-arguments]
Effect: Launch the application using the given arguments. Start collecting immediately and end collection when the application stops. Trace CUDA, OpenGL, NVTX, and OS runtime libraries APIs. Collect CPU sampling information and thread scheduling information.
Limited trace only run
$ nsys profile --trace=cuda, nvtx -d 20
    --sample=none --cpuctxsw=none -o my_test <application>
    [application-arguments]
-d 20 : Start collecting immediately and end collection after 20 seconds or when the application ends.
Trace CUDA and NVTX APIs. Do not collect CPU sampling information or thread scheduling information.
Delayed start run
$ nsys profile -e TEST_ONLY=0 -y 20
    <application> [application-arguments]
Collect ftrace events
nsys profile --ftrace=drm/drm_vblank_event
    -d 20
Effect: Collect ftrace drm_vblank_event events for 20 seconds. Note that ftrace event collection requires running as root.
To get a list of ftrace events available from the kernel, run the following:
$ sudo cat /sys/kernel/debug/tracing/available_events
E.g. profile a Python script that uses CUDA
$ nsys profile --trace=cuda,cudnn,cublas,osrt,nvtx
    --delay=60 python <my_dnn_script.py>
Effect: Launch a Python script and start profiling it 60 seconds after the launch, tracing CUDA, cuDNN, cuBLAS, OS runtime APIs, and NVTX as well as collecting thread schedule information.
Interactive CLI Command
Collect from beginning of application, end manually
nsys start --stop-on-exit=false
nsys launch --trace=cuda,nvtx --sample=none <application> [application-arguments]
nsys stop
Effect: Create interactive CLI process and set it up to begin collecting as soon as an application is launched. Launch the application, set up to allow tracing of CUDA and NVTX as well as collection of thread schedule information. Stop only when explicitly requested.
If you start a collection and fail to stop the collection (or if you are allowing it to stop on exit, and the application runs for too long) your system's storage space may be filled with collected data causing significant issues for the system. Nsight Systems will collect a different amount of data/sec depending on options, but in general Nsight Systems does not support runs of more than 5 minutes duration.
Run application, begin collection manually, run until process ends
nsys launch -w true <application> [application-arguments]
nsys start
Effect: Create interactive CLI and launch an application set up for default analysis. Send application output to the terminal. No data is collected until you manually start collection at area of interest. Profile until the application ends.
NVIDIA Isaac Sim
Isaac Sim is a robotics simulation application and synthetic data generation tool. Within Isaac Sim, you can program, train and test any robot design. The simulation environment enables the creation of photorealistic worlds filled with specific objects that the robot can interact with.

New Features
- Multi-Camera Support
- Fisheye Camera with Synthetic Data
- ROS2 Support
- PTC Onshape Importer
- Improved Sensor Support
- Ultrasonic Sensor
- Force Sensor
- Custom Lidar Patterns
- Downloadable from NVIDIA Omniverse Launcher
Synthetic Data Generation
Isaac Sim has built-in support for a variety of sensor types that are important in training perception models. These sensors include RGB, depth, bounding boxes, and segmentation.
Output synthetic data in the KITTI format. This data can then be used directly with the NVIDIA Transfer Learning Toolkit to enhance model performance with use case-specific data.
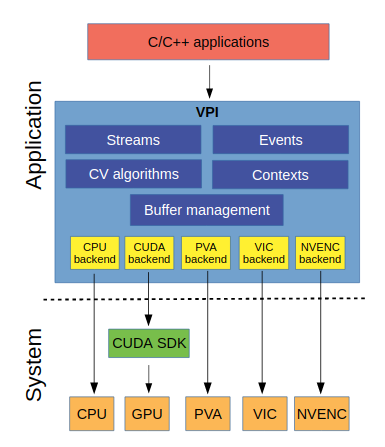
NVIDIA VPI
NVIDIA VPI is a library that abstracts heterogeneous video stream computing on NVIDIA embedded devices. VPI provides a common API to use various hardware modules for accelerating computer vision applications.
VPI supports the backends CPU, GPU (using CUDA), PVA (Programmable Vision Accelerator), VIC (Video and Image Compositor) and NVENC(Video encoder engine).
| Backend | Device/platform |
|---|---|
| CPU | All devices on x86 (linux) and Jetson aarch64 platforms |
| CUDA | All devices on x86 (linux) with a Maxwell or superior NVIDIA GPU, and Jetson aarch64 platforms |
| PVA | All Jetson AGX Xavier series and Jetson Xavier NX devices |
| VIC | All Jetson devices. |
| NVENC | All Jetson devices. Noting that nvenc that has dense optical flow is only supported on Jetson AGX Xavier series. |
New Features
- Support for different processing backends
- VPI allows a combination of different backends in the same processing pipeline.
- Zero copy, shared memory mapping interface to manage data between the different backends.
- The API is designed to minimize initial memory allocations typically required just at the starting stage of many computer vision algorithms.
- OpenCV and EGL interoperability.
- Synchronization mechanisms that are agnostic of the backend being used.
Jetpack
Path: /opt/nvidia/vpi/vpi-0.1
Example

python
import vpi
input = vpi.Image((640,480), vpi.Format.U8)
with vpi.Backend.CUDA:
    output = input.box_filter(3)
c++
#include <vpi/Image.h>
#include <vpi/Stream.h>
#include <vpi/algo/BoxFilter.h>

int main()
{
    VPIImage input, output;
    vpiImageCreate(640, 480, VPI_IMAGE_FORMAT_U8, 0, &input);
    vpiImageCreate(640, 480, VPI_IMAGE_FORMAT_U8, 0, &output);

    //Create a stream to execute the algorithm.
    VPIStream stream;
    vpiStreamCreate(0, &stream);

    //Submit the box filter algorithm to the stream
    vpiSubmitBoxFilter(stream, VPI_BACKEND_CUDA, input, output, 3, 3, VPI_BORDER_CLAMP);

    //Wait until the stream finishes processing.
    vpiStreamSync(stream);

    //Destroy created objects.
    vpiStreamDestroy(stream);
    vpiImageDestroy(input);
    vpiImageDestroy(output);

    return 0;
}
Conceptual structure:

Nvidia Triton Server
Triton is an efficient inference serving software enabling you to focus on application development. It is open-source software that serves inferences using all major framework backends: TensorFlow, PyTorch, TensorRT, ONNX Runtime, and even custom backends in C++ and Python. It optimizes serving across three dimensions.
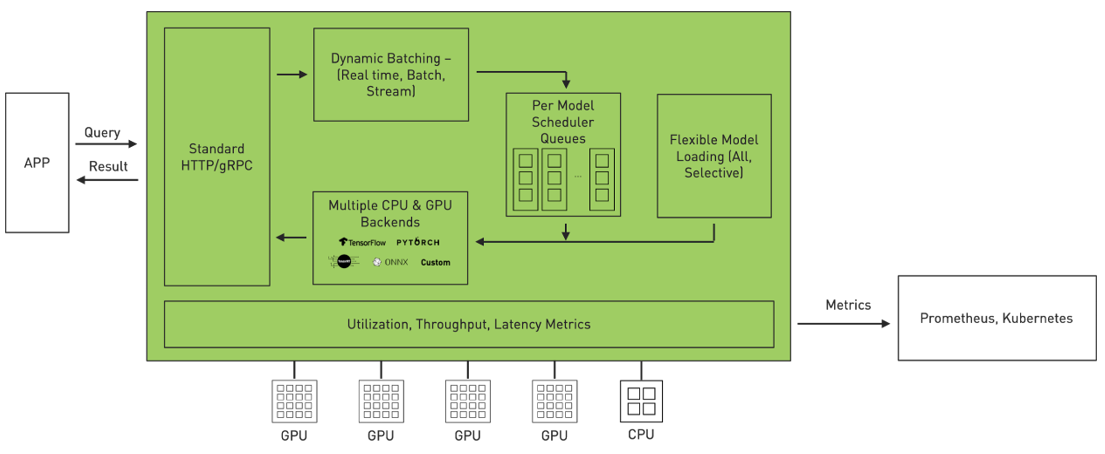
New Features
- Multiple models can run simultaneously on the same GPU.
- Batching Support
- Ensemble support
- Multi-GPU support
- Model repositories in Google Cloud Storage, or in Amazon S3
Setup
- Set up our own inference server (docker container)
- write a python client-side script (communicate with the inference server to send requests, and get back predictions response)
Requirments
- Nvidia CUDA enabled GPU
- Nvidia Docker
- Triton Client libraries for communication with Triton inference server
- Your deep learning platform library (Tensorflow/pytorch)
Approach
Step 1: Install Triton Docker Image
Pull the image:
$ docker pull nvcr.io/nvidia/tritonserver:<xx.yy>-py3
Step 2: Create A Model Repository The model repositor is the directory where you place the models that you want Triton to server.
Step 3: Run Triton
Run on System with GPUs
$ docker run --gpus=1 --rm -p8000:8000 -p8001:8001 -p8002:8002 -v/full/path/to/docs/examples/model_repository:/models nvcr.io/nvidia/tritonserver:<xx.yy>-py3 tritonserver --model-repository=/models
Run on CPU-Only System
$ docker run --rm -p8000:8000 -p8001:8001 -p8002:8002 -v/full/path/to/docs/examples/model_repository:/models nvcr.io/nvidia/tritonserver:<xx.yy>-py3 tritonserver --model-repository=/models
Step 4: Verify Triton Is Running Correctly
$ curl -v localhost:8000/v2/health/ready
Result e.g.
...
< HTTP/1.1 200 OK
< Content-Length: 0
< Content-Type: text/plain
Shared-Memory
The shared-memory extensions allow a client to communicate input and output tensors by system or CUDA shared memory. Using shared memory instead of sending the tensor data over the GRPC or REST interface can provide significant performance improvement for some use cases.
shared_memory_region and shared_memory_byte_size two parameters are required. If only one of the two is given Triton will return an error.
Shared memory regions must be created by the client and then registered with Triton before they can be referenced with a "shared_memory_region" parameter.
Check Status, register, unregister
Triton exposes the following URL to register and unregister system shared memory regions.
GET v2/systemsharedmemory[/region/${REGION_NAME}]/status

POST v2/systemsharedmemory/region/${REGION_NAME}/register

POST v2/systemsharedmemory[/region/${REGION_NAME}]/unregister
cuda memory
GET v2/cudasharedmemory[/region/${REGION_NAME}]/status

POST v2/cudasharedmemory/region/${REGION_NAME}/register

POST v2/cudasharedmemory[/region/${REGION_NAME}]/unregister
Server Docker Command
$ docker run --gpus=1 -v /dev:/dev --ipc=host --shm-size=1g --rm \
-p8000:8000 -p8001:8001 -p8002:8002 \
-v /host/model_repository:/models \
nvcr.io/nvidia/tritonserver:21.03-py3 \
tritonserver --model-repository=/models
-v /dev:/dev --ipc=host --shm-size=1g is shared memory flag.
Client Docker Command
$ docker run --gpus all -it  \
--privileged --network host -v /dev:/dev --ipc=host --shm-size=1g  -v /tmp/.X11-unix:/tmp/.X11-unix \
-e DISPLAY=$DISPLAY  --name client_shm_sdk nvcr.io/nvidia/tritonserver:21.03-py3-sdk
Check System Shared Memory Status:
$ curl localhost:8000/v2/systemsharedmemory/region/input0_data/status
input0_data is register name from client.
e.g.:
[{"name":"input0_data","key":"/input0_simple","offset":0,"byte_size":64}]%
Nvidia DALI
DALI is a data loading and preprocessing library to build highly optimized custom data processing pipelines used in deep learning applications.
The set of operations that can be found in DALI includes, but is not limited to, data loading, decoding multiple formats of image, video, and audio, as well as a wide range of processing operators.
Workflow 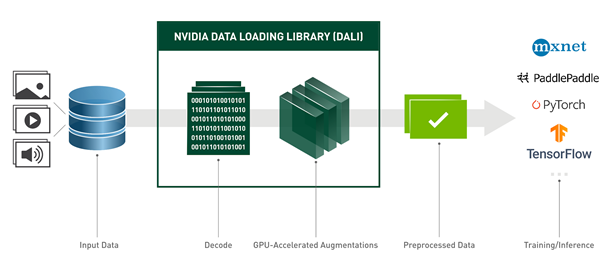
Jetson
Jetson Tools
Install jtop:
$ sudo pip3 install jetson-stats
Run:
$ sudo jtop
Install pygame
python2 version pygame
$ sudo apt update
$ sudo apt install python-pygame
python3 version pygame
$ sudo apt update
$ sudo apt install libsdl-dev libsdl-image1.2-dev libsdl-mixer1.2-dev libsdl-ttf2.0-dev
$ sudo apt install libsmpeg-dev libportmidi-dev libavformat-dev libswscale-dev
$ sudo apt install libfreetype6-dev
$ sudo apt install libportmidi-dev

$ sudo apt install python3-pip
$ pip3 install pygame==1.9.6
TLT(Transfer Learning Toolkit) V3
UNET
convert model to engine
$ ./tlt-converter -k nvidia_tlt -e xxx.engine -t fp16 -p input_1,1x3x320x320,4x3x320x320,16x3x320x320 /model_dir/xxx.etlt
TLT(Transfer Learning Toolkit) v2 command
MaskRCNN TLT
Train
$ tlt-train mask_rcnn -e maskrcnn_your_spec.txt -d model_out_dir --gpus 1 -k $YOUR_KEY
Evaluate
$ tlt-evaluate mask_rcnn -e specs_file -m model.tlt -k $YOUR_KEY
Inference
$ tlt-infer mask_rcnn -i /image-dir -o result/ -e spec_file -m model.tlt -t 0.2 --include_mask -k $YOUR_KEY
Jetson Nano Troubleshooting
Issue: Could not get EGL display connection
Solution:
- Make sure DISPLAY is not set. Unset if necessary.
- Disable X11-forwarding.
SD Card Backup & Restore
Backup
Step 1: Check your SD card in your host Linux PC
$ sudo parted -l
This command sample result:
Model: Generic MassStorageClass (scsi) Disk /dev/sdb: 31.9GB Sector size (logical/physical): 512B/512B Partition Table: msdos Disk Flags:
Number Start End Size Type File system Flags 1 4194kB 31.9GB 31.9GB primary fat32 lba
Step 2: Check SD card unmount
$ sudo umount /dev/your-sd-card
sample result:
sudo umount /dev/sdb umount: /dev/sdb: not mounted.
Step 3: save as image file
$ sudo dd if=/dev/yourSdCard conv=sync,noerror bs=64K | gzip -c > ~/backup_nano.img.gz
Restore
Step 1:
$ sudo su
Step 2:
$ gunzip -c ~/backup_nano.img.gz | dd of=/dev/YourSdCard bs=64K
Swap memory for Jetson nano
Step 1: check current swap status.
$ free -m

Step 2: Disable nvzram
$ sudo systemctl disable nvzramconfig

Step 3:
$ sudo fallocate -l 4G /mnt/4GB.swap
$ sudo chmod 600 /mnt/4GB.swap
$ sudo mkswap /mnt/4GB.swap
Step 4: modifiy fstab file
$ sudo vim /etc/fstab
Add this line,
/mnt/4GB.swap swap swap defaults 0 0
